Microsoft Places
How to Upload IMDF Map Files into Microsoft Places
This post follows on from our article on how to create IMDF files and explains the various steps required to prepare and then upload your IMDF floorplans into Places.
You can view these steps in this Microsoft guide, however this article seeks to clarify these somewhat confusing steps and explain what’s happening and why.
Before you start….
To get started, you’ll need a set of IMDF files – at least enough for a test floorplan – and bookable resources set up in Microsoft 365 for the building and floor you want to work with.
For more information on how to configure your resources and the pre-requisite building and floor hierarchy, check out this article.
A Bit of Background..
Each bookable workspace that’s defined in Microsoft Places has its own unique identifier (PlaceID).
Likewise, the system that you use to create your IMDF floorplans will also allocate a unique identifier to each feature (e.g. each desk or meeting room) depicted in your floorplan graphic.
In order to work properly in Places, the information in your IMDF files needs to be updated to use the relevant Places IDs. Microsoft has provided some PowerShell commands that will help you achieve this correlation (see below), although you can add this information manually into your IMDF files if you prefer (and you know what needs doing).
The following steps walk you through the correlation and upload process, with a view to explaining what’s happening at each stage:
Step 1: Extract the IDs used by Places & your IMDF files into CSVs
In order to correlate an object depicted on the IMDF map to the corresponding workspace in Places, you will first need to ‘gather’ these two sets of IDs into separate CSV files.
This involves the following PowerShell commands:
1.1 First, get the PlaceID for the Building You’re Working With:
Each building in Places is given a unique ID. Execute the following command to get the ID that’s been allocated:
Get-PlaceV3 -Type Building | ? {$_.DisplayName -eq 'Building Name'} | ft DisplayName,PlaceId
1.2 Create a CSV file of PlaceIDs for this Building
Insert the building PlaceID provided in step 1.1 into the following command, specifying the file name and path for the CSV file to be created:
Get-PlaceV3 -AncestorId <buildingplaceid> | export-csv "[path\to\yourBuildingName.csv]" -NoTypeInformation
This will generate a CSV file that lists all the bookable spaces defined in Places for the specified building, including building, floors, sections, rooms, workspaces and desks, each with its corresponding PlaceID.
TIP: It is best to name this CSV according to your building name.
IMPORTANT: Note that some IMDF creation platforms let you upload the CSV file created in steps 1.1 and 1.2 and produce an IMDF.zip file which is pre-correlated. This will allow you to skip the next steps and go straight to step 4.
1.3 Create a CSV File of the IDs used in Your IMDF Files
Next, upload your IMDF files and extract the IDs (featureIDs) for each object or ‘feature’ described in them using this PowerShell command:
Import-MapCorrelations -MapFilePath "[path\to\your\imdffile.zip]"
A new csv file called mapfeatures.csv will be created in the same folder as your IMDF file.
Step 2: Correlate your Places and IMDF IDs
You will now need to manually cross-reference the information gathered into the two CSV files you’ve created in step 1.
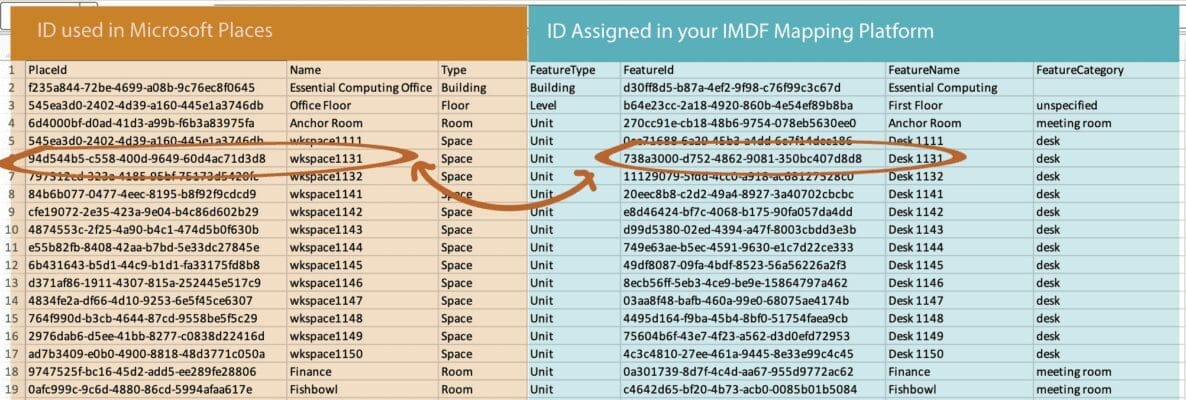
To do this, copy the PlaceId, Name and Type for each object in the CSV created in Step 1.2, and paste this into the CSV file created in Step 1.3, mapfeatures.csv, being careful to match row for row.
When you’ve done, it will look something like this:

The examples ringed above show that the desk resource we called ‘wkspace1131’ in Microsoft Places matches onto what we referred to as ‘Desk 1131’ in our IMDF map creation process.
Note that you will only need to match each object that will be bookable in your system.
If there are any objects that don’t have a PlaceID, these will essentially be the non-bookable objects such as room dividers, shared spaces and other elements that will help the viewer locate their preferred workspaces. These will still appear on your uploaded floorplan.
Step 3: Update your IMDF files using your ‘correlated’ CSV file
You can now import your IMDF files again, but this time, with your completed cross-referenced CSV file:
Import-MapCorrelations -MapFilePath "[path\to\your\imdffile.zip]" -CorrelationsFilePath "[path\to\mapfeatures.csv]"
This command will save a new correlated IMDF file called “imdf_correlated.zip” to the same location as your un-correlated IMDF file.
TIP: It is best to rename this new IMDF file to include your building name.
Step 4: Upload Your Updated IMDF Map Files into Places
By the end of step 3, you should have a correlated IMDF file from which you can create a new map for your building.
To upload your correlated IMDF file, use the following command:
New-Map -BuildingId <buildingplaceid> -FilePath "[path\to\your\imdf_correlated.zip]"
Hopefully all will go well and you won’t have any errors. If you do, you may want to check out this Places troubleshooting article.
What Happened Behind the Scenes After These Steps?
So as you can see, there are a lot of steps involved in the correlation process, and it can be a bit confusing!
The key thing to bear in mind is that you’re switching up the IDs allocated in your IMDF creation platform to ones that are used in Places.
A key change that is made to your IMDF file(s) after completing these steps is that each bookable object defined in your IMDF files will now have a directory_id property set to the corresponding PlaceID in Microsoft Places.
See examples below based on just one desk:
What Your IMDF File Looks Like Before Correlation
Here’s an example of the code needed to describe just a single desk in a non-correlated file:
{
      "feature_type": "unit",
      "type": "Feature",
      "id": "738a3000-d752-4862-9081-350bc407d8d8",
      "properties": {
        "name": { "en": "Desk 1131" },
        "category": "workspace",
        "alt_name": null,
        "restriction": null,
        "level_id": "b64e23cc-2a18-4920-860b-4e54ef89b8ba",
        "building_ids": ["d30ff8d5-b87a-4ef2-9f98-c76f99c3c67d"],
        "address_id": null,
        "unit_id": null,
        "display_point": null,
        "smtp_address": null,
        "ordinal": null,
        "custom_category": null
      },
      "geometry": {
        "type": "Polygon",
        "coordinates": [
          [
            [-2.7593087883862197, 51.48768895640797],
            [-2.759198396543169, 51.48768895640797],
            [-2.759198396543169, 51.48758707090899],
            [-2.7593087883862197, 51.48758707090899],
            [-2.7593087883862197, 51.48768895640797]
          ]
        ]
      }
    }
Your IMDF File After Correlation
Here’s the code after the correlation – you’ll notice the addition of a unique directory_ID which links the desk to the relevant Places object:
{
      "feature_type": "unit",
      "type": "Feature",
      "id": "738a3000-d752-4862-9081-350bc407d8d8",
      "properties": {
        "name": { "en": "Desk 1131" },
        "category": "workspace",
        "alt_name": null,
        "restriction": null,
        "level_id": "b64e23cc-2a18-4920-860b-4e54ef89b8ba",
        "building_ids": ["d30ff8d5-b87a-4ef2-9f98-c76f99c3c67d"],
        "address_id": null,
        "unit_id": null,
        "display_point": null,
        "smtp_address": null,
        "directory_id":"797312ed-323a-4185-95bf-75173d5420fc",
        "ordinal": null,
        "custom_category": null
      },
      "geometry": {
        "type": "Polygon",
        "coordinates": [
          [
            [-2.7593087883862197, 51.48768895640797],
            [-2.759198396543169, 51.48768895640797],
            [-2.759198396543169, 51.48758707090899],
            [-2.7593087883862197, 51.48758707090899],
            [-2.7593087883862197, 51.48768895640797]
          ]
        ]
      }
    }
We plan to do more digging on your behalf as to what happens ‘behind the scenes’ in Microsoft Places, but we hope this clarifies what’s happening as you carry out these steps.
Stay tuned by subscribing to our Places updates.


